Travel Doorway Theater

Hurricane Sandy is on her way towards NYC and now that we’ve stocked up on necessary supplies, charged our phones and gathered our batteries, I realize if the power goes out my girls are going to be B-O-R-E-D.  I had a bunch of felt socked away for an awesome dining room table playhouse slipcover I never made so I pulled it out and, while watching three consecutive zombie movies (you know, to make sure I know all the appropriate moves in case I have to battle the un-dead), I created this little doorway puppet theater to entertain them.

Materials:
1 piece of 53″ x 30″ felt
felt & fabric scraps for curtain, frame and awning
ribbon for curtain tiebacks as well as to hold up the theater (hidden)
2 3M Command hooks

DIY Baby Gnome Costume

A few years ago when my first child was celebrating her first Halloween (at a mere 3 months old) my husband and I were determined to make her a unique costume. Since it was a DIY I submitted it to Apartment Therapy where it was picked up by a few blogs, and now my sweet girls’ photo is making the rounds on Pinterest.  Since I am not sure if the instructions have followed her sweet photo, I thought I’d share it here since it was super-simple:

Materials:
1 turquoise dress (Imps & Elfs, purchased on sale @ HauteLook)
18″ of 1.5″ black satin ribbon, cut to baby’s waist
2″ x 2″ piece of cardboard for belt buckle
1 white bib
1 pair black tights
square of red felt + old party hat
hot glue gun and double-sided tape

Description:
I took apart the party hat, used it as a pattern and cut the red felt to size, then with a hot glue gun, covered the party hat in felt and glued the hat back together.

The beard was made of a basic white bib, cut randomly to look like the whiskers of a beard.

The belt was made of black ribbon, cut to the baby’s waist size.  The buckle was made out of a 2×2 piece of cardboard which I cut two slits into and thread the ribbon through.

Once together, the end piece of ribbon was secured with a piece of double-sided tape. I dressed the baby in tights and dress, slipped on the belt, hat, and bib – and voila! My own roaming gnome.

Here’s a picture of the finished product:

How cute is she??

Leafy Chandelier

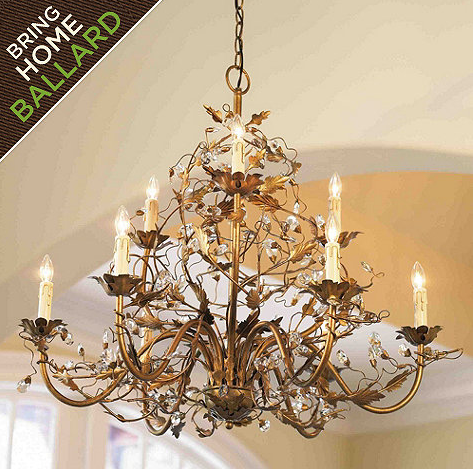
When my husband and I moved into our first NYC apartment together we had the most fabulous neighbors – Bryan & Ross – who had an even more fabulous sense of design.  My favorite piece in their eclectic apartment was a gorgeous brass chandelier featuring leaves and crystals.  Unconventional, but very cool.

Shortly before we moved out they were downsizing and decided to put a few items up for sale.  The chandelier was on the list and despite the ridiculously good price, I couldn’t get my husband to agree to it.  Even though I do not necessarily have a place for it in NYC apt #5, I have pined and searched for it for years.  Finally, my wishes came true when I found this pretty similar replica on Ballard Designs.  The 9-Arm Grande Claire Chandelier is only $299 – not too shabby.

Ballard Design 9-Arm Grande Claire Chandelier, $299

Ballard Design 9-Arm Grande Claire Chandelier, $299

Now, I just need a house to put it in…

Baby Shadow Box

When you have a baby you get a lot of stuff.  Some of it’s worth keeping, some is not.  For the sweet little memories, especially from your little babe’s first few days of life, consider creating a shadow box so the goodies can be displayed in the baby’s room.

Materials:
Shadow box
Keepsakes
Stick pins

I had two shadow boxes from the Great Family Tree Project of 2007 which made it on the wall on our last apt, but never quite made the cut in our current one.  In fact, it had been collecting dust in the corner so I was happy to complete this project.

I admit, the final product is lacking a bit but I still need to dig up the outfits the girls wore home, as well as a photo or two to be included in the shadow box.
Have you done something similar?  If so, let me know how it turned out.

Fried Quinoa

Tonight I converted an old chicken & cashew fried rice recipe – a staple food of mine for most of 2007 – but used quinoa instead of white rice and it. was. amazing.
UPDATE: Here is the recipe for this amazing dish.  Unfortunately I did not get a photo before devouring the meal, but that should speak to how amazing it truly is, no?

Ingredients:
1 cup quinoa, uncooked
1 tbsp veg or canola oil
1 heaping tsp of crushed garlic (any type is fine, really)
1 red chili, sliced
1 egg
1 tsp sugar
1/4 cup soy sauce
1/2 cup scallions, chopped
1/2 cup basil, choppped

Start by cooking your quinoa.  The key is to rinse it in a fine mesh strainer ahead of time, they add the 1 cup of quinoa to 2 cups boiling water.  For added flavor I like to add a bullion cube to the pot pre-quinoa.  Bring the combo to a boil then simmer for 10-15 minutes, or until the quinoa is fuffy and liquid is absorbed.

While the quinoa is cooking add the oil to a wok.  Add the garlic and brown until golden.  Then add the chilies; cook on low for 2-3 minutes.   Move the chilies and garlic aside, and crack an egg in the middle of the pan.  Allow it to fry until set, then using a wooden spoon, divide into slices.

Add the cooked quinoa, sugar, and soy sauce; mix well.  This is where I keep wok on the burner and throw in the scallions, basil and mix well.  If you prefer to use them as garnish instead, I won’t judge you. Enjoy!